Mike Bartick: Bokeh-licious
This latest installment of articles by Mike Bartick for Wetpixel focuses on Bokeh. Mike is a professional underwater photographer who is widely published and also manages the Crystal Blue Dive Resort in Anilao, Philippines. Wetpixel will be publishing a series of articles and images by Mike chock full of invaluable underwater photography tips and techniques.
Recently while sharing some images with a group of photographers I mentioned the word “Bokeh”. I guess I just assumed that everyone knew what bokeh was before I began showing different examples of it, to my astonishment I was wrong. The thing is, bokeh is a bit of a paradox. It exists in every photo already but can be so subtle that the new shooter’s don’t even notice it. Once learned, it then becomes a word tossed around in a conversation as more experience is gained.
Subtle yet powerful I think describes it best. Its a method, an action, a result, a flavor, a dimension, a cultural style, an art form, its all of these things and more, yet, so easily missed.
I don’t want to pontificate from on-high with the subject but want to illuminate the gap, the very place of where good bokeh lives and discuss it’s qualities and different ways to play with it.
Bokeh has long been an obsession of mine, learning how to use it best, which lens works better than others, and how to exploit using it in my photos. Any discussion of bokeh can get geeky very quickly so I’ll do my best to avoid it.
In a nutshell, bokeh is the creamy or out of focus portion of an image both before and after the sharp areas. And while it’s true that bokeh is controlled by the lenses aperture and diaphragm it can also be controlled by distance to the primary subject, background and light.
What is Bokeh
-Bokeh- A Japanese phrase or locution that means “blur”.
-Bokeh-aji - Goes a bit further as to grade the aesthetic quality of bokeh, Coarse/fine etc..
-Bokashi- Refers to the intentional use of bokeh, “blurring” or “gradation”
Although I’ve never used the last two terms in a conversation, I’ve often discussed, what the terms describe, particularly when analyzing mine or another photographers work. One thing I look for is how smooth or creamy the bokeh is. This typically tells me that the shooter really paid some attention the photo making process and that some thought has entered into the equation.
Mechanical build of a lens creates bokeh naturally and heres how. The diaphragm in the lens is built with blades, the blades come together to form the desired aperture. More blades generally means more expensive but also means smoother edges the bokeh, curved blades are even better. Today’s lenses are built primarily with seven to nine blades. “Old school” lenses such as Zeiss/Planar or Meyer Gorlitz Trioplan lenses have as many as seventeen curved blades which results in a nice smooth bubble like bokeh or creamy swirls. Some of this can get really crazy too.
Grading and judging bokeh basically hovers around the shape of the sphere. If the edges are noticeable in your bokeh bubble it is regarded as coarse or poor bokeh. If the bokeh is smooth, it would be regarded as a good bokeh and so on. However, its appearance should always remain a part of the shooters tastes and discretion, and should be regarded as such. The good news is, getting great bokeh can still be achieved by lenses with less blades, so don’t be discouraged.
An interesting thing that should also be included is the advent of the Mirrorless cameras to the market. Many of the lenses produced for them are F1.8 which is very fast. These lenses are great for producing creamy and bubbly bokeh without breaking the bank.
Bokeh can also be enhanced when there are multiple points of light in the background such as anything reflective or if there are lights in the background which will appear as bubbles or dappled light.
The ABC’s of creating natural Bokeh:
Open F-stop (smaller number)
-Focus closer to your subject then the background
-Focus on what you want sharp
-Use of a fast lens ( 2.8 or greater, 1.9, 1.8)
-Using old collectors lenses (Trioplan/Ziess planar/Old Nikon etc)
-Controlling the Light
To gain better bokeh simply be closer to the focal point then the background is. Natural bokeh can be seen using this method when your shooting as high as F14 or even higher. If you want to exaggerate the blur, simply open your F-stop.
Macro Wide Open or “MWO” as I like to call it, is a technique where I challenge myself to shoot with my aperture wide open. When the aperture is wide open a few issues will quickly become obvious and challenge you to problem solve. For one, the sudden influx of light will immediately become apparent. F-stop adjustments will force you to quickly evaluate all light sources. Strobe, sun strength and distance to the subject will be a part of the equation and muscle memory will be established quickly.
The challenge here will be, how to use enough strobe power to freeze the action, beat the sun and not overexpose! If all else fails, remember, exposure compensation. Finding the medium between haze, contrast and white balance will also be your challenge so a little post work might also be needed.
Then there is the man made method of creating bokeh which can be limitless in approach. Often times, ill collect stuff that I might see in a store, on a walk or on a dive site that might have the potential to add interesting bokeh to an image. This is the fun part where concept and creativity intertwine.
Diopters can also alter natural bokeh due to magnification. Recently, I’ve taken to using a low powered diopter with my 60mm lens. While this isn’t very effective for creating a super macro image, it is highly effective at creating buttery bokeh and sharp foreground presence in the frame.
Try to remember “attraction vs. distraction” when using manmade bokeh. Overuse can quickly begin to take away from the photo rather then add, so use caution. Like the secret ingredient in a recipe, you want a hint of the flavor to create a certain dimension to the profile of a dish, being careful not to overwhelm the main ingredient.
Ideas for man made bokeh:
-Embellished fabric/sequenced
-Reflective objects
-Background torch with or without color
-Diopters
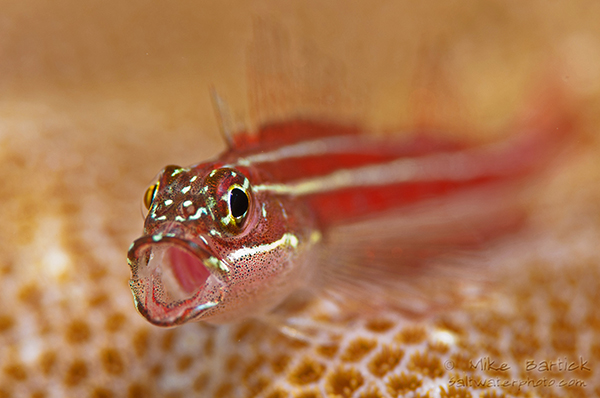
.jpg)
Pink Eyed Gobies
Nikon D500
105mm/2.8 lens
F22 @ 1/200
Different patterns lend themselves to bokeh more than others. getting to know what your lens and camera are capable of naturally, will help to form ideas for a more compelling composition. Even at a higher F-stop, nearness to the subject in the foreground instantly begin’s to blur the background. Lighting is essential and contrast can be lost if the sun is allowed to impede. Keep your ISO low and shutter speed fast when opening your aperture.
.jpg)
Nikon D7100
105mm
F3.5 @ 1/250
Opening the aperture as much as you can will dramatically increase the amount of light passing through the aperture. This further shaped by the blades in the diaphragm. Shutter speed will temper the amount of light that is allowed to strike the sensor plane. Focus on the foreground subject being sure that it is closer then the background and adjust for exposure.
.jpg)
.jpg)
Nikon D500
105mm
F-5.3 @ 1/200
When I shoot gobies I don’t normally like the open the aperture past the F-7.1 mark as the details from front to back of the frame can exclude the eye or other important features of my subject. When shooting very close to your subject this will become readily apparent. The problem is, underwater, the LCD makes everything look perfect. The LCD lies, beware! Finding mature whip corals with large gobies and big polyps isn’t always easy, in fact its pretty special. So when I come across something this unique I try to spend as much time with it as I can, whole using as many different techniques as possible. High key style exposure’s is when the highpoint run dangerously close to being burned out while keeping the color of your subject.
.jpg)
Nikon D500
60mm
F14 @ 1/200
I use a torch to backlight many of my subject’s, specially hairy frogfish but in a silty environment this can often spell disaster. However, it can also add to an image if captured correctly. I didn’t like this image so much but as I viewed it a bit more, it grew on me. I like the way the light and backscatter work to create the dappled bokeh in this photo and even as it leans very hard on being too much, I feel it still works.
.jpg)
Nikon D500
trioplan 50mm/nikon mount-Manual aperture
1.4 teleconverter
F2.8 @ 1/320
Using a video light and a torch for lighting, I wanted to create a really good example of something going bad. Going back to the principal of keeping the main ingredient the most important portion of the dish, I feel that obnoxious bokeh in an image kills the shot. Using “old school” lenses can also present some other challenges too, like no CPU for the lens and camera to communicate. And even though I love the effect of the lens, shot selection now becomes a vital component limiting your shoot and scoot abilities.
.jpg)
Nikon D7100
105mm
F-7.1 @ 1/200
Frogfish/Sequenced fabric
For this example I used black sequenced fabric to create the bubbles. I keep a small bag of various items in my workbench for such occasion. When using something like fabric I try to light the back with a torch, once this is set up, I concentrate on my subject in the foreground. The subject is on a flat plain in the foreground allowing a single strobe from the right to light it. Using a shallow f-stop, the background becomes distorted enough to eliminate the texture of the fabric, the sequence is highlighted by my torch.
.jpg)
Nikon D500
105mm
Kraken +13 diopter
F-18 @ 1/200
Nudibranch’s are a great target subject too as they are so colorful and wildly textured. For this supermacro image, im using a diopter to make a larger subject huge in the frame. Opening the aperture even slightly intensifies the creamy effect of the bokeh.
.jpg)
Nikon D500
60mm
CMC Macro converter
I don’t normally promote the use of a diopter with a 60mm lens, however if it’s bokeh your after then this is the set up. The CMC creates sharp, front of the frame presence while creating creamy bokeh. Particularly fun with larger slugs.
Nikon D7100
105mm
F8 @ 1/160
Trying to create a feel with texture and light. Ive noticed that these guys tend to Bark! not that I’ve heard them doing it, but in their actions. Triple fins swim a pattern and will return to the same place on the hard coral over and over. I adjusted for the background exposure and waited while this guy would bark, fly off and return, over and over, allowing me several attempts to capture the image.
.jpg)
Nikon D7100
105mm
F8 @ 1/200
Back ground torch
White slate
Neutral lens filter with a small round sticker placed in the center
For this whacky image I used the combination of things as listed above. Placing a small sticker over the lens also creates weird bokeh. You can also do this with different shapes like hearts or diamonds or even anything else your so inclined to try. The sticker shapes the light before it enters the diaphragm, as long as your f-stop is wider then the sticker then you can focus and shoot around it.
Unhinge yourself to the traditional ideas of underwater photography and experiment. Run your camera through the extremes of the settings to learn what your system is capable of. Once you learn your systems strengths, harness its power to become more creative. After all, the power of creativity is at the tips of your fingers.
-Mike Bartick